- You do not need a telescope, binoculars, or any equipment for night one. Your eyes are enough.
- Pick a clear night with a crescent or no moon, then get away from streetlights if you can.
- Give your eyes 20-30 minutes to adapt to the dark. Use red-screen mode if you need your phone.
- Find 2-3 constellations, spot a planet, and you have had a successful first session.
- Free apps like Stellarium turn your phone into an instant star map.
- The right gear progression is naked eye, then binoculars, then telescope.
- 2026 is beginner-friendly: a total solar eclipse in August, moonless Perseids, and a Venus-Jupiter conjunction in June.
Join 1,000+ Stargazers
Weekly sky events, gear reviews, and beginner observing tips. No spam.
Why Start Stargazing in 2026
On any clear night, roughly 2,500 stars are visible to the naked eye from a dark location. Point binoculars at the sky and that number jumps past 100,000. A small telescope reveals millions of objects — including galaxies whose light has traveled millions of years to reach you.
Stargazing is one of the few hobbies with zero barrier to entry. No membership, no signup, no gear required. Walk outside, look up, and you've started.
But 2026 is a particularly good year to begin. The night sky is stacked with events that reward even first-timers: a total solar eclipse crossing Iceland, Greenland, and Spain on August 12; the Perseid meteor shower peaking under a new moon (ideal dark-sky conditions that won't happen again for years); a Venus–Jupiter conjunction in June where the two brightest planets appear close enough to cover with your pinky finger; and a total lunar eclipse on March 3 visible from the Americas, Asia, and Australia.
You don't need to understand any of those terms yet. This guide will get you there. It covers exactly what to do on your first night, what to look at, what gear to buy (and what to skip), and how to build real knowledge of the sky week by week.
If you prefer structured learning with printable star charts and a 6-week observation program, the Stargazing Secrets course picks up exactly where this guide leaves off.
What You Need (and What You Don't)
Here's what most beginners think they need versus what actually matters.
You do NOT need:
- A telescope (not for months — it's the #1 premature purchase)
- Prior astronomy knowledge
- Dark skies (your backyard works for planets and the Moon)
- Expensive apps (the best one is free)
- A clear understanding of constellations before your first session
You DO need:
- A clear night (check the hourly forecast — under 20% cloud cover)
- 30 minutes of uninterrupted time outside
- A way to preserve your night vision (red-screen phone mode or a red LED flashlight)
- A star chart or app to identify what you're seeing (Stellarium is free and excellent)
- Warm clothes (you'll be standing still — dress warmer than you think)
That's it. Everything else is optional and comes later.
Choose Your Path
Stargazing works at every budget level. Here are two paths to your first night, depending on what you have on hand.
Path A: No Equipment ($0)
This path uses nothing but your eyes, your phone (with red-screen mode enabled), and a free app.
What you can see with naked eyes alone:
- The Moon — every phase reveals different details. Watch the shadow line (called the terminator) where craters stand out in sharpest relief.
- Planets — Venus blazes in the west after sunset. Jupiter shines steady and white. Mars glows faint red. Planets don't twinkle; stars do. That's how you tell them apart.
- Constellations — Orion in winter, the Summer Triangle in summer, the Big Dipper year-round in the Northern Hemisphere.
- The Milky Way — under dark skies (Bortle 4 or darker), a cloudy luminous band stretches across the sky. That's our galaxy seen from the inside, edge-on.
- Meteor showers — no equipment needed, just patience and dark skies. Lie on a blanket and look up.
- Satellites and the ISS — bright points of light gliding silently across the sky. The ISS is unmistakable; it's brighter than any star.
What to do: Follow the step-by-step first night walkthrough below using only your eyes and Stellarium on your phone.
Path B: Binoculars ($60–$150)
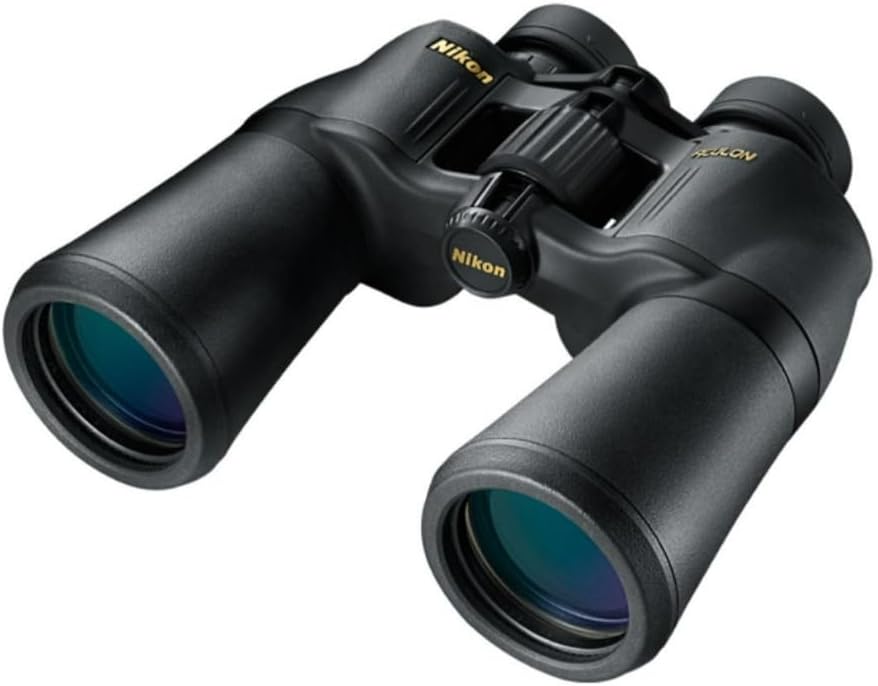
If you own any binoculars — even a dusty old pair from a closet — you already have the single most underrated astronomy tool. If you're buying specifically for stargazing, a 10×50 pair is the best all-around choice for beginners: 10× magnification and 50mm objective lenses that gather enough light for serious celestial viewing while staying light enough to hold steady.
What binoculars add:
- Moon craters in dramatic detail, especially along the terminator at first or last quarter
- Jupiter's four Galilean moons as tiny dots flanking the planet (their positions change every night)
- The Orion Nebula (M42) resolved from a fuzzy star into a glowing gas cloud
- The Pleiades cluster exploding from 6 naked-eye stars into dozens of blue-white points
- The Double Cluster in Perseus — two open clusters side by side, stunning in any binoculars
- The Beehive Cluster (M44) in Cancer — too large for most telescope eyepieces, perfect in binoculars
- The Andromeda Galaxy (M31) as a distinct elongated smudge under dark skies
For specific binocular and telescope recommendations, see the full gear progression section below, or jump to our best budget telescopes roundup.
Your First Night Out: Step-by-Step Walkthrough
Forget theory. Here is exactly what to do, from sunset to around 11 pm.
Before Sunset — Prepare (15 Minutes)
Check three things:
- Weather. Open any weather app and look at the hourly forecast. You need clear skies — less than 20% cloud cover. Partly cloudy often means the best parts of the sky are blocked exactly when you want them.
- Moon phase. Search "moon phase tonight" on your phone. A new moon or thin crescent is ideal for seeing faint objects like the Milky Way, nebulae, and star clusters. A full moon washes out everything faint — but the Moon itself is spectacular through binoculars, and planets are always visible regardless of moon phase.
- Location. Your backyard works for night one. Face away from streetlights and porch lights. If you can drive 15–20 minutes outside town to a dark park entrance, parking area, or rural road pulloff, the difference is dramatic. Use lightpollutionmap.info to find dark spots near you.
Bring:
- A reclining lawn chair or blanket (neck strain is the enemy of long sessions)
- Warm layers, even in summer (standing still at night gets cold fast)
- A red LED flashlight (or your phone in red-screen mode) for reading charts without destroying your night vision
- Binoculars if you have them
- A printed star chart or Stellarium on your phone
Set your phone to red-screen mode now:
- iPhone: Settings → Accessibility → Display & Text Size → Color Filters → Color Tint → slide to deep red
- Android: search "night mode" in settings, or download "Twilight" or "Red Moon" app
Sunset to Dusk — Spot the First Objects (30 Minutes)
- Watch for the first bright "star." The first point of light after sunset is almost always a planet. Venus in the west is unmistakable — far brighter than anything else. Jupiter is steady and white, usually visible all night when it's above the horizon. The key trick: planets shine with steady light while stars twinkle. Twinkling happens because starlight passes through many layers of turbulent atmosphere; planets are close enough that their light doesn't scatter the same way.
- Start your dark adaptation timer. From the moment you stop looking at white light, your eyes need 20–30 minutes to fully adjust. Your retinas produce a photosensitive pigment called rhodopsin that makes you dramatically more sensitive to faint light. One glance at a white phone screen resets the entire process. Red light does not.
- Find north (Northern Hemisphere) or south (Southern Hemisphere). Use a compass app briefly, then put your phone face-down. In the Northern Hemisphere, Polaris (the North Star) sits almost exactly above true north and never moves. To find it: locate the Big Dipper, then trace a line through the two stars at the outer edge of its "cup" and extend that line upward about 5× the distance between those two pointer stars. That line leads directly to Polaris. Once you've found it, you've unlocked the whole sky: everything rotates around that point. Face north, and east is to your right, west to your left.
Full Dark — Explore (1–2 Hours)
- Find your first constellation. Start with the easiest one for the current season:
- Winter: Orion dominates the southern sky with his unmistakable three-star belt. Below the belt hangs his "sword" — the middle "star" there is actually the Orion Nebula. - Spring: Follow the arc of the Big Dipper's handle to the bright orange star Arcturus ("arc to Arcturus"). Continue the same curve to reach Spica. - Summer: Three bright stars form the Summer Triangle directly overhead — Vega (the brightest), Deneb, and Altair. These belong to three different constellations (Lyra, Cygnus, and Aquila). - Fall: The Great Square of Pegasus sits high in the sky. From its northeast corner, two chains of stars extend toward the horizon — that's Andromeda, home to the nearest major galaxy.
- Scan for the Milky Way (dark skies only). A faint luminous band arching across the sky. That is hundreds of billions of stars too faint to see individually, blended into a soft glow. It's best in summer, when the galactic center in Sagittarius passes overhead. If you can see it at all, you're in a good location.
- Try binoculars on three targets (if you have them):
- The Moon along the terminator (shadow line), where craters appear in sharpest 3D relief - The Pleiades (Seven Sisters), which explodes from 6–7 naked-eye stars into a dazzling field of blue-white points - Jupiter, where you can see up to four tiny dots flanking the planet in a line — those are the Galilean moons (Io, Europa, Ganymede, Callisto), discovered by Galileo in 1610
- Log what you saw. Date, time, conditions, what you found, what surprised you. This sounds trivial, but after a few weeks you'll notice patterns — which objects you can find easily, which elude you, how the sky shifts night to night. It's one of the fastest ways to build real knowledge.
First-night rule of thumb: Don't try to learn the whole sky in one session. Finding 2–3 constellations and spotting one planet is a successful first night. You'll retain more by going slowly and intentionally.
First-Night Checklist
Use this as a go/no-go preflight before your first session. Copy it, print it, or screenshot it.
Planning (afternoon)
- Checked hourly weather forecast — less than 20% cloud cover tonight
- Checked moon phase — ideally new moon or thin crescent
- Picked an observing location — backyard, park, or rural pulloff
- Downloaded Stellarium (free) or have a printed star chart
Packing
- Reclining chair or blanket
- Warm layers (jacket, hat, gloves if cold)
- Red LED flashlight or phone set to red-screen mode
- Binoculars (optional — any pair works)
- Notebook and pen for logging
On Site
- Arrived 30 minutes before full dark
- Phone in red-screen mode — no white light after this point
- Dark adaptation timer started (20–30 minutes)
- Found north using the Big Dipper → Polaris method
- Identified at least one planet (Venus or Jupiter)
- Found at least one constellation for the current season
- Tried binoculars on at least one target (Moon, Pleiades, or Jupiter)
- Logged date, time, conditions, and what you observed
After
- Noted one thing to look for next time
- Checked 2026 sky calendar for upcoming events
How to Find Constellations Season by Season
Learning constellations is easier than it looks. The fastest method is star-hopping: start from a bright star or pattern you already know, then navigate to adjacent ones by direction and distance. Every constellation connects to its neighbors.
Winter (December–February): Start with Orion
Orion is the anchor of the winter sky. His belt — three bright stars in a tight row — is visible from almost anywhere on Earth and recognizable even from city centers.
Star-hop from Orion:
- Follow the belt down-left to Sirius (the brightest star in the entire sky) in Canis Major
- Follow the belt up-right to the orange star Aldebaran in Taurus, and beyond it to the Pleiades cluster
- Draw a line from Orion's right shoulder (Betelgeuse) through the belt to Rigel (his left foot), then extend it to find Gemini's twin stars Castor and Pollux
- Between Orion and Gemini, look for the faint cluster of Messier 35
Spring (March–May): Arc to Arcturus
Find the Big Dipper. Follow the curve of its handle and it leads to Arcturus, the brightest star in the spring sky and the fourth-brightest star visible from Earth. Continue the same arc to Spica in Virgo. This single curve — "arc to Arcturus, spike to Spica" — unlocks the spring sky.
The spring sky is also prime galaxy-hunting season. The Virgo Cluster, a swarm of over a thousand galaxies about 54 million light-years away, is well-placed for binoculars and small telescopes.
Summer (June–August): The Summer Triangle
Three stars dominate summer: Vega (in Lyra), Deneb (in Cygnus the Swan), and Altair (in Aquila the Eagle). Together they form the Summer Triangle, which sits nearly overhead on summer evenings. The Milky Way runs right through the middle of the triangle — under dark skies, Cygnus looks like it's flying along the river of stars.
Fall (September–November): The Great Square and Andromeda
The Great Square of Pegasus — four stars forming a large square — is the fall landmark. From its northeast corner, two chains of stars curve toward the horizon. That's the constellation Andromeda, and near the middle of the upper chain you can find the Andromeda Galaxy (M31) — a faint smudge of light that's actually 2.5 million light-years away and contains roughly a trillion stars. It's the most distant object visible to the naked eye.
Learning pace: Add one new constellation per clear session. After 10–12 nights spread across a season, you'll know the sky well enough to point out any major feature without an app. That's all it takes.
For printable monthly sky charts, the Stargazing Secrets course includes charts for every month of the year plus a structured 6-week observation program.
What to Look At: Beginner Target List by Gear Level
Naked Eye (Any Conditions)
| Target | What to Look For | Difficulty |
|---|---|---|
| The Moon | Trace the terminator (shadow line) for crater detail. Every phase looks different. | Easy |
| Venus | Blazingly bright in the west after sunset or east before sunrise. Unmistakable. | Easy |
| Jupiter | Steady white light, usually visible all night when above the horizon. | Easy |
| Mars | Faint reddish-orange point. Brightness varies by opposition cycle. | Easy |
| Orion's Belt | Three aligned stars. Gateway to Sirius, Aldebaran, Pleiades, and Gemini. | Easy |
| The Pleiades | A tight blue cluster in Taurus. Naked eye shows 6–7 stars; sharp-eyed observers see more. | Easy |
| The Big Dipper → Polaris | Use the pointer stars to find north. Works every clear night. | Easy |
| Andromeda Galaxy (M31) | Faint smudge north of the Great Square of Pegasus. Dark skies required. | Moderate |
| The Milky Way | Luminous band across the sky. Best in summer. Requires Bortle 4 skies or darker. | Moderate |
| ISS passes | Bright, fast-moving, doesn't twinkle. Use the Heavens-Above app for pass times. | Easy |
Binocular Targets (Any 8×42 or 10×50 Pair)
| Target | What You'll See | Best Season |
|---|---|---|
| Moon craters | Dozens of named craters along the terminator. Dramatic at first/last quarter. | Any |
| Jupiter's moons | Up to 4 tiny dots in a line. Positions change nightly. Brace elbows for stability. | Any (when up) |
| Orion Nebula (M42) | Glowing gas cloud with 4 young stars (the Trapezium) at its core. | Winter |
| Pleiades (M45) | 6–7 naked-eye stars explode into 50+ blue-white points. | Fall/Winter |
| Double Cluster (NGC 869/884) | Two open clusters side by side between Perseus and Cassiopeia. | Fall/Winter |
| Beehive Cluster (M44) | Large open cluster in Cancer. Too big for most telescope eyepieces, perfect in binoculars. | Spring |
| Andromeda Galaxy (M31) | Elongated smudge under dark skies. You're seeing light that traveled 2.5 million years. | Fall |
| Coathanger Cluster (Cr 399) | An asterism in Vulpecula shaped like a coathanger. Fun, easy binocular target. | Summer |
Telescope Targets (4-inch / 100mm Aperture and Up)
| Target | What You'll See | Notes |
|---|---|---|
| Saturn's rings | Unmistakable even at 40×. One of the most reliably jaw-dropping sights in all of astronomy. | Any (when up) |
| Jupiter's cloud bands | At 100×, the two main equatorial belts. Great Red Spot visible on the right night. | Any (when up) |
| Orion Nebula (M42) detail | Trapezium resolves into individual young stars surrounded by glowing nebulosity. | Winter |
| Globular clusters (M13, M5, M22) | Dense spheres of hundreds of thousands of ancient stars. M13 is the summer showpiece. | Summer |
| Andromeda Galaxy (M31) full extent | Disk stretches several Moon-widths under dark skies. | Fall |
| Ring Nebula (M57) | Tiny, ghostly smoke ring in Lyra. Easy to find between the two southern stars of Lyra. | Summer |
| Albireo (β Cygni) | Beautiful double star at the head of Cygnus — one gold, one blue. Binoculars also work. | Summer |
For detailed telescope recommendations at every budget level, see our best budget telescopes roundup and our best telescopes for home use guide.
Best Times to Stargaze
Timing your sessions correctly is the single highest-leverage move you can make as a beginner. The same location can look like two completely different skies depending on when you go.
Moon Phase: The Most Important Variable
The Moon is roughly 400,000 times brighter than the Milky Way. Even a half-moon washes out nebulae, galaxies, and faint star clusters. Plan your deep-sky sessions around the new moon window.
- New Moon (days 0–4): Darkest skies. Best for the Milky Way, nebulae, galaxies, and star clusters. Prime observing window.
- Crescent Moon (days 4–8): Good. Moon sets early, leaving dark skies after 9–10 pm. The crescent itself is beautiful through binoculars — look for Earthshine on the dark portion.
- Quarter Moon (days 7–10): Moon sets around midnight. Plan deep-sky observing for after moonset.
- Gibbous to Full Moon (days 10–15): Limited deep-sky. Focus on the Moon itself (flat full-moon lighting reveals the contrast between dark maria plains and bright highland regions), planets, and the brightest star clusters (Pleiades, Beehive).
Key rule: Planets are visible regardless of moon phase. Jupiter, Saturn, Venus, and Mars don't care about moonlight. On bright moon nights, switch your focus to planets and the Moon itself. There's always something worth observing.
Best Time of Night
Astronomical twilight ends roughly 90 minutes after sunset. After that, the sky reaches maximum darkness. For most latitudes, the sweet spot is between 10 pm and 2 am — objects are highest in the sky (meaning you're looking through the least atmosphere), air temperature has stabilized (less atmospheric turbulence), and light pollution from businesses and streetlights often drops as commercial areas shut down.
Seasonal Highlights
Each season rotates different objects into prime viewing position:
- Winter: The richest constellation region in the sky — Orion, Taurus, Gemini, Auriga, and Canis Major — plus the Orion Nebula at its peak.
- Spring: Galaxy season. The Virgo Cluster and dozens of Messier galaxies are well-placed for telescopes.
- Summer: The Milky Way at its brightest, arcing directly overhead through Sagittarius. Globular clusters at their best. Peak meteor shower season.
- Fall: The Andromeda Galaxy reaches near-zenith. Cassiopeia and Perseus offer rich star fields and clusters.
Best Places to Stargaze
Light pollution is the single biggest limiter on what you can see. A city-center sky might show 200 stars. A dark rural site reveals 2,500 to 4,500 — and the Milky Way becomes a river of light stretching horizon to horizon.
The Bortle Dark-Sky Scale
The Bortle Scale rates sky darkness from 1 (pristine, observatory-grade) to 9 (inner city). Here's what matters in practice:
Bortle 1–3 (rural/remote): The Milky Way is bright enough to cast visible shadows. Zodiacal light is obvious. The Triangulum Galaxy (M33) is visible to the naked eye. This is what a true dark sky experience feels like. Many designated International Dark Sky Parks fall in this range.
Bortle 4–5 (rural-suburban transition): The Milky Way is clearly visible with some structural detail. Most Messier objects are accessible with binoculars. This level is achievable with a 30–45 minute drive from most mid-size cities, and it's more than good enough for a transformative beginner experience.
Bortle 6–7 (suburban): The Milky Way is faint or washed out, but bright nebulae, clusters, planets, and the Moon remain excellent. Many regular stargazers work from Bortle 6–7 skies and see plenty.
Bortle 8–9 (city): Milky Way invisible. Planets, the Moon, brightest stars, and a few clusters only. Still absolutely worth observing — Jupiter's moons and Saturn's rings don't care about light pollution.
How to find dark skies near you: Use lightpollutionmap.info (interactive map with real-time data) or search the International Dark-Sky Association directory for certified Dark Sky Parks and Reserves near you.
For our ranked guide to the world's best astronomy destinations, see 31 Best Stargazing Spots in the World.
The most common reason beginners give up: They observe from a light-polluted backyard, see a few bright stars, and conclude stargazing "isn't that impressive." The fix is simple — drive 30 minutes out of town once, to Bortle 4–5 skies. The difference isn't incremental. It's like switching from a grainy thumbnail to a high-resolution photograph.
2026 Night Sky Calendar: Events You Can't Miss
These are the headline events for 2026 that reward beginners with no or minimal equipment.
Must-See Events
March 3 — Total Lunar Eclipse (Blood Moon) Visible from the Americas, Asia, Australia, and the Pacific. The full Moon passes through Earth's umbral shadow and turns deep copper-red. Visible to the naked eye with no special equipment — just look up at the Moon. Totality begins around 6:00 UTC and lasts over an hour.
June (exact date varies) — Venus–Jupiter Conjunction The two brightest planets in the sky appear less than a finger-width apart in the evening sky. No telescope needed. One of the most visually striking naked-eye events of the year.
August 12 — Total Solar Eclipse The path of totality crosses northern Russia, Greenland, Iceland, and Spain. A partial eclipse will be visible from Alaska, Canada, most of Europe, and northern Africa. This is the first total solar eclipse visible from western Europe since 2015. Requires proper solar viewing glasses during partial phases.
August 12–13 — Perseid Meteor Shower (Peak) This year's Perseids coincide with a new moon — ideal dark-sky conditions. Under dark skies, expect up to 60–100 meteors per hour. The Perseids are famous for bright, colorful fireballs and persistent trains. No equipment needed; lie on a blanket and look up. Best after midnight.
December 13–14 — Geminid Meteor Shower (Peak) Widely considered the best meteor shower of the year, the Geminids can produce up to 150 meteors per hour. A waning crescent Moon sets before the shower peaks, giving mostly dark skies for prime viewing.
Other Notable Dates
| Date | Event | Equipment Needed |
|---|---|---|
| Jan 3–4 | Quadrantid meteor shower peak | Naked eye |
| Jan 10 | Jupiter at opposition (brightest of 2026) | Naked eye / binoculars |
| Feb 17 | Annular solar eclipse (visible from Antarctica) | Solar glasses |
| Feb 28 | Six-planet alignment after sunset (Mercury, Venus, Neptune, Saturn, Uranus, Jupiter) | Naked eye for 3; binoculars for all 6 |
| April 22 | Lyrid meteor shower peak (favorable moon) | Naked eye |
| May 31 | Blue Moon (second full moon of May) | Naked eye |
| Sept 7 | Saturn at opposition | Binoculars / telescope |
| Oct 6 | Lunar occultation of Jupiter (east of St. Louis, North America) | Naked eye |
| Nov 16 | Mars near Jupiter in predawn sky | Naked eye |
| Nov 25 | Uranus at opposition | Binoculars / telescope |
| Dec 23 | Supermoon (year's final, brightest) | Naked eye |
Pro tip: Subscribe to weekly sky event emails. The TelescopeGuides newsletter sends sky highlights, gear deals, and observation tips every week — subscribe free here.
Best Stargazing Apps and Tools
Essential Apps (Free)
Stellarium (iOS, Android, desktop — free) The gold standard. Point your phone at the sky and it overlays real-time labels on every star, planet, constellation, and deep-sky object in your field of view. Works offline once downloaded — critical when you're far from cell service. The desktop version (stellarium.org) is excellent for pre-planning sessions: set any date, time, and location to preview exactly what will be visible.
Clear Outside (web and app — free) Not a star chart, but essential for planning. It shows hourly cloud cover, transparency, seeing conditions, humidity, and wind — all tuned specifically for astronomers. Far more useful than a standard weather app. Available at clearoutside.com.
Heavens-Above (web and app — free) Tracks the International Space Station, satellites, and rocket bodies. Get notifications before ISS passes over your location. The ISS is one of the easiest and most exciting things for beginners to spot — it looks like a brilliant star gliding silently across the sky.
Worth the Upgrade
SkySafari (iOS, Android — paid) Deeper database than Stellarium (covers NGC, IC, and double star catalogs). Connects to computerized telescopes for push-to and go-to control. The planning tools and observation lists are excellent for building a structured program.
Physical Tools
Planisphere ($10–$15): A rotating paper star chart matched to your latitude. Set the current date and time on the dial and it shows you exactly what's above the horizon. No batteries, no glare, no distraction. Under $15 at any bookshop or Amazon. Still one of the fastest learning tools available.
Red LED flashlight ($5–$10): A standard flashlight, even on dim, destroys your dark-adapted vision instantly. A red LED preserves it. Cheap, small, essential. Buy one or tape red cellophane over a regular flashlight.
Gear Progression: From Naked Eye to First Telescope
The most common beginner mistake is buying a telescope before learning the sky. A telescope is a precision aiming instrument — it's useless if you can't point it at something worth seeing. Here's the right progression, with specific recommendations at each level.
Tier 1: Naked Eye Only ($0–$20)
Spend your first few sessions here. Learn 5–10 constellations, spot the visible planets, follow the Moon through its phases, and attend to at least one meteor shower. A planisphere and a red flashlight are the only purchases. This stage costs almost nothing, takes 2–4 weeks, and builds the foundational sky knowledge that makes everything afterward more rewarding.
Tier 2: Binoculars ($60–$150)

Binoculars are the most underrated astronomy tool. They require zero setup, zero alignment, and they show you 10–50× more stars than your naked eye. They're intuitive — you already know how to use them. And they reveal genuinely stunning views of the Moon, star clusters, nebulae, and Jupiter's moons.
Recommended specs for astronomy: 10×50 is the best all-around choice. The first number is magnification (10×), the second is the diameter of the objective lens in millimeters (50mm). Larger objectives gather more light but get heavy. A 10×50 pair balances light grasp, weight, and stability. For dedicated astronomy binoculars where a tripod is available, 15×70 gathers significantly more light and reveals fainter objects.
Tier 3: First Telescope ($100–$300)
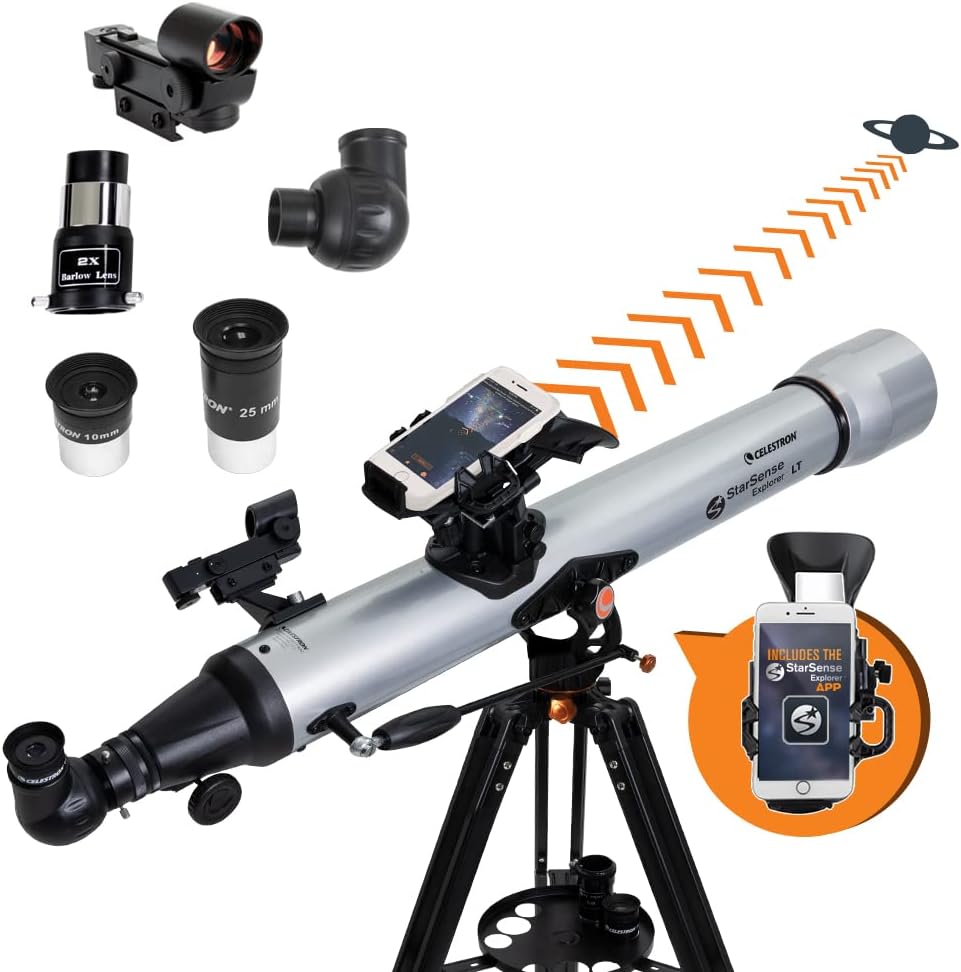
Once you can find at least 5–10 constellations by eye and have logged several binocular sessions, you're ready. Skip the department-store refractors with "525× zoom" on the box — those produce dim, shaky, useless images at high magnification through a tiny lens.
What to buy instead: A tabletop Dobsonian reflector gives you the most aperture (light-gathering power) per dollar. Aperture is the single most important telescope specification. A 5-inch (130mm) Dobsonian at $200 will outperform a $300 computerized refractor with a 70mm lens for every target except the Moon.
For detailed comparisons, read our full best budget telescopes for 2026 roundup and our guide to the types of telescopes and their uses.
When to consider GoTo: A computerized GoTo telescope automatically locates and tracks objects from a 40,000+ database. It's transformative for deep-sky observing. But it adds cost, complexity, and alignment time. Most beginners get more value from a simple Dobsonian first, then graduate to GoTo once they know what they want to see. If portability matters — for travel or apartment balcony use — see our best travel telescopes guide.
Astrophotography: If you're curious about photographing the night sky, that's a separate (and rewarding) path. Our beginner astrophotography equipment guide covers what you need to get started, from camera choice to mount selection.
7 Mistakes Every Beginner Makes (And How to Avoid Them)
1. Buying a telescope before learning the sky. A telescope magnifies a tiny patch of sky. If you don't know where to aim it, you'll spend the night frustrated, staring at random black sky, and conclude the telescope is broken or astronomy isn't for you. Spend at least a month with naked eyes and binoculars first. You'll enjoy your telescope 10× more once you know what to point it at.
2. Choosing magnification over aperture. That "500× zoom!" telescope at the department store is marketing fiction. High magnification through a small lens produces a dim, shaky, blurry image. A 4.5-inch (114mm) reflector at 80× magnification shows dramatically more than a cheap 60mm refractor pushed to 300×. Always prioritize aperture (the diameter of the main mirror or lens) over magnification claims.
3. Not dark-adapting. Going outside, glancing up for two minutes, checking your phone, and concluding the sky "looks empty" is the most common reason beginners quit. Give your eyes 20–30 full minutes in darkness. The transformation is dramatic — faint stars appear, the Milky Way materializes, and the sky goes from flat to three-dimensional. One white-light phone check resets the entire process.
4. Only stargazing from light-polluted locations. Suburban and city skies are perfectly fine for the Moon, planets, and bright constellations. But if your only experience is a lit suburb, you haven't seen what stargazing actually looks like. Drive 30 minutes to Bortle 4–5 skies once. It will permanently recalibrate your expectations of the hobby.
5. Expecting to see what photographs look like. Long-exposure astrophotography reveals colors and structural detail that are invisible to the human eye. Visual observing is a different experience: it's real-time, direct, and alive. The Orion Nebula through a telescope looks nothing like the Hubble image — but you're seeing it with your own photons, live, from 1,344 light-years away. That context makes it extraordinary in a way no photograph can replicate.
6. Trying to learn the whole sky in one night. This leads to information overload and nothing sticking. The constellation-a-night approach works: learn one new pattern per session, and after 10–12 clear nights you'll know the entire sky for your season. Speed kills retention in astronomy.
7. Skipping the observation log. It feels unnecessary at first. But after a month of logged sessions, patterns emerge that teach you faster than any book: which objects are easy, which conditions produce the best seeing, when the planets are visible, and how the sky shifts through the seasons. A simple notebook with date, time, conditions, and targets is enough.
Where to Go Next: Your Stargazing Roadmap
You've read the guide. You've done your first night. Now what? Here's the progression path, organized by experience level.
Month 1: Foundation
- Complete 3–4 naked-eye sessions using the first-night checklist
- Learn the major constellations for the current season
- Track the Moon through one complete phase cycle
- Identify 3 planets (Venus, Jupiter, and one of Mars/Saturn)
- Watch one satellite or ISS pass
Months 2–3: Binocular Phase
- Acquire any pair of binoculars (10×50 recommended)
- Work through the binocular target list
- Observe Jupiter's moons on three different nights (their positions change)
- Attend to a meteor shower from a dark-sky location
- Observe from Bortle 4–5 skies at least once
Months 3–6: Telescope Ready
- Research and purchase a first telescope (see best budget telescopes)
- Learn the types of telescopes and which suits your use case
- Start working through the Messier catalog (110 deep-sky objects — a classic astronomer's challenge)
- Consider joining a local astronomy club or attending a star party (clubs often have loaner telescopes)
Beyond: Level Up
- Explore astrophotography with our beginner equipment guide
- Plan a stargazing trip to one of the world's best dark-sky sites
- Take the Stargazing Secrets course for a structured 6-week program with printable star charts, or get the complete 3-course bundle for $47