- What do you need to connect a telescope to a computer?
- What cable do you need to connect a computer with a telescope
- What is ASCOM?
- Steps to connect a telescope to a computer
- Can you control your telescope remotely?
- Free software you can use to connect and control your telescope
- Takeaway Connect your telescope to a computer for convenient skywatching
The easiest way to connect and control your telescope with a computer is to use a free planetarium software called Stellarium. This software supports many computerized mounts, and after a successful connection, you can control the telescope from your computer.
Viewing the sky through the eyepiece of your telescope is enriching. However, pairing your telescope with a computer can be more fulfilling.
First, with image-enrichment computer applications, viewing telescope images on a computer screen gives you a more detailed view of celestial objects. Secondly, when paired with a telescope, a computer makes it easy to locate and track deep-sky objects.
What do you need to connect a telescope to a computer?
To connect a telescope to a computer, you need three things:
- A computer
- An astronomy software
- A telescope
Computer
Needless to say, to connect a telescope to a computer, you will need a computer.
While you can connect your telescope to a desktop computer, a laptop is preferable so that you can easily take it outside with the telescope.
You don’t need a powerful system to do this, but I prefer a faster laptop for smooth work. If you use a very old laptop, the whole process can be slow, frustrating, and discouraging, and we don’t want that.
Astronomy software
Next, you need to find the right astronomy software. There are different programs out there, ranging from basic to specialized options for specific telescopes.
If you want to get professional-quality views of celestial bodies without breaking the bank, you should go for Stellarium[1]. It is a free open-source planetarium for your computer that is very easy to use. Stellarium is well-made, as it shows a realistic real-time sky in 3D, just like what you see with the naked eye, binoculars, or a telescope.
The Stellarium astronomical software is available for Windows, Mac OS X, and Linux operating systems.
Telescope
And the last thing we need is, of course, a telescope. But not an ordinary telescope. We need a telescope on a computerized mount with a GoTo system.
I recommend two GoTo telescopes – Celestron NexStar 130 SLT computerized telescope and the SkyWatcher 130P GoTo telescope. So you can check my reviews.
If you’re looking for the best telescope for the money, Dobsonians are highly recommended. You can’t go wrong with the Orion SkyQuest XT8 Classic Dobsonian Telescope.
The telescope mount will have a hand controller, which you have to connect to your computer. Now you can encounter a few issues.
- RS-232 to serial port cable
- USB to RS-232 serial adapter cable
- USB AB cable
- RS-232 to serial port cable
- USB to RS-232 serial adapter cable
- USB AB cable
Determining the cable you’ll need can be problematic because cables to connect the computer with the hand control are usually not provided in the telescope package when you buy it.
You have to buy the cable separately, and you’ll find different types of connections, as below
RS-232 to serial port cable
The older models of hand controllers only have RS-232 ports (landline-type connectors).
In my experience, if you have this type of port on your hand control, you will get the cable in the package with the telescope (and sometimes and adapter module). But the problem is that the cable provided is not USB. Instead, it is RS-232 to serial port cable.
I don’t understand why some telescopes are shipped with this controller and cable. It is 90’s technology, and I bet there are no computers with serial ports in your house anymore.
USB to RS-232 serial adapter cable
The solution to using the outdated RS-232 to serial port cable is to buy a Serial to USB reduction cable. They are easy to find and cost just a few bucks.
USB to serial adapter cables are used to convert USB data signals to and from serial communication standards (serial ports). Thus, the setup lets you connect your hand controller to the computer via USB.
However, in my personal experience, it doesn’t work every time because some serial to USB cables are incompatible and don’t operate.
USB AB cable
Where the serial to USB cable does not work, you should go for the third cable option – the USB AB cable.
For this, you need to upgrade your hand control with a new one. New versions come with a USB AB connection, making it easy to connect with the computer.
The cable’s type “A” connector is a flattened rectangle that plugs into downstream port sockets on the USB hub, while the “B” connector is a beveled corner square that plugs into upstream sockets on devices and hubs.
You may be familiar with this type of connection because it is widely used on printers. So you may have a few cables lying around in your house.
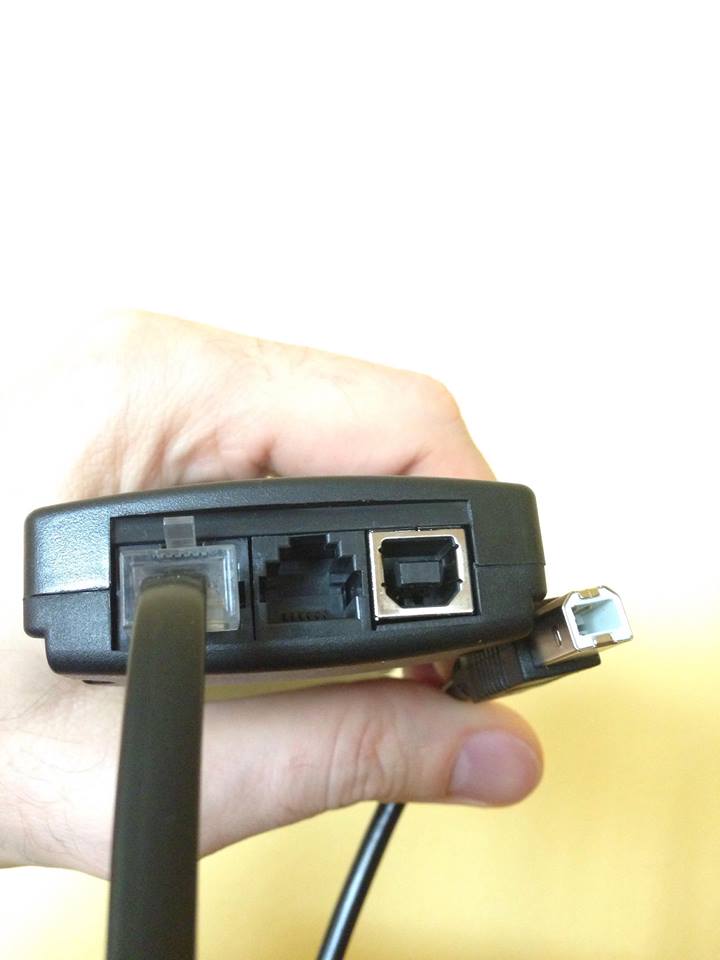
Still, it took too long before telescope manufacturers started making those upgraded hand controllers.
What is ASCOM?
ASCOM is an abbreviation for Astronomy Common Object Model. It is used to connect a variety of telescope equipment to different software.
You don’t have to know about ASCOM if you are a beginner. But it is a part of connecting the computer with a telescope. Plus, you may find the term later on when pursuing the astronomy hobby. So, it is good to know what it is.
ASCOM[2] is an open initiative to provide a standard interface for the different equipment used in astronomy (including telescope mounts, focusers, and imaging devices) in a Microsoft Windows environment.
Trying to explain what ASCOM means is hard. But I love the explanation by Dylan O’Donnell.
Dylan has a Master’s in Information Technology, and NASA and ESA are just some astronomy concerns that have featured his astrophotography. He is also a member of Team Celestron, where he also contributes. To date, two of his images have been selected for NASA Astronomy Photo of the Day (APOD).
Dylan explains that ASCOM is like a mediator between the different hardware and software you use in astronomy that allows them to talk to each other. Thus, in a world without ASCOM, when you buy a particular manufacturer’s telescope, you’ll be locked in one ecosystem as you’ll need to buy their camera, control software, etc.
If you want to know more about what ASCOM is, watch this video:
Steps to connect a telescope to a computer
There are two ways of connecting your telescope to a computer. The first one is to connect the telescope mount via USB, which will allow you to point the telescope at anything you want with the software.
- 1. Set up your telescope
- 2. Cable the telescope and computer together
- 3. Connect the telescope to Stellarium
There are two ways of connecting your telescope to a computer. The first one is to connect the telescope mount via USB, which will allow you to point the telescope at anything you want with the software.
The second type of connection is to place a camera into the eyepiece and connect it to the computer. This connection will allow you to transfer the live image onto your screen, but you won’t be able to control the telescope.
If you combine these two methods, you will get full control of the telescope with the computer. So you can control it remotely and also see everything on the computer screen. This is commonly used in long-exposure astrophotography and video astronomy.
I have already explained how to connect a simple webcam to a telescope to do some basic astrophotography and live viewing. This article is focused only on controlling your mount with the computer.
With the Stellarium software, connecting your telescope to a computer is an easy process that includes 3 steps:
1. Set up your telescope
Before you hook up the telescope with your laptop, you need to set up the telescope first. Setting up your telescope means star-aligning the scope properly.
Check out this How to use AZ GoTo computerized telescope article for the step-by-step process to star-align your telescope.
You can’t connect your telescope to a computer before star-aligning the scope because it will not work. The telescope needs to be set up first, and you must go through the star alignment with your hand controller.
After you do that and it works and tracks properly, you can bring your laptop and the cable.
2. Cable the telescope and computer together
Most telescopes feature an RS-232 interface for remote control. Using a cable, connect the RS-232 jack in the scope to your computer’s serial or USB port.
Traditionally, you’ll use an RS-232 to serial port cable to connect the RS-232 jack to the computer. But with many systems now abandoning serial ports in favor of USB ports, you’ll need a serial-to-USB adapter.
When using a USB adapter, make sure the drivers for the Serial to USB adapter are installed. Also, check the device manager to know which port the USB adapter is connected to. Lastly, ensure that your connections are snug.
3. Connect the telescope to Stellarium
Connecting your telescope to Stellarium is a straightforward process that completed in a few minutes.
To connect your telescope to Stellarium:
- Start Stellarium
- Load the plugin
- Confiure your telescope
- Engage the connection
Start Stellarium
To start using Stellarium, open the app on your computer.
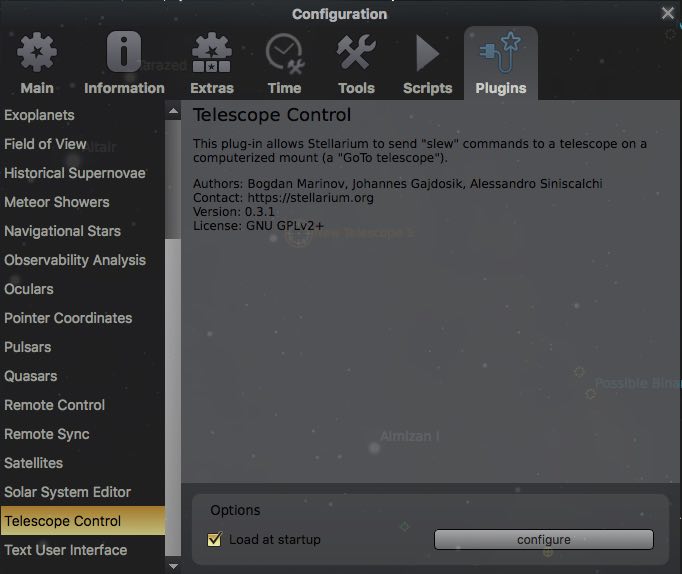
Load the plugin
You cannot configure your telescope if the plugin is not loaded. So, you need to load the plugin first.
After starting Stellarium, go to the configuration window and click on plugins. On the left side of the window, scroll down and search for “Telescope Control.”
When you click on “Telescope Control,” the “Configure” button is not clickable until you have loaded the plugin. To do this, tick the “Load At Startup” box, and restart the Stellarium.
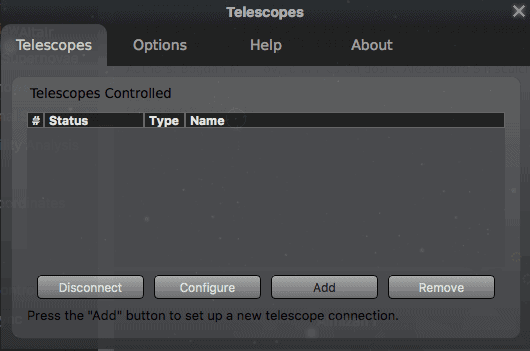
Configure your telescope
When Stellerium restarts, the plugin will be loaded. So, go ahead and find it again. Then click the “Configure” button.
The “configure” button will open the telescope window. It will be empty. Now click the “add” button, and another window will open with settings.
Leave everything as is and go to the Telescope properties. Here, you can change a name and choose a device model in the drop-down menu.
Pick the manufacturer of the telescope you have. It can be Celestron, Sky-Watcher, Meade, or another.
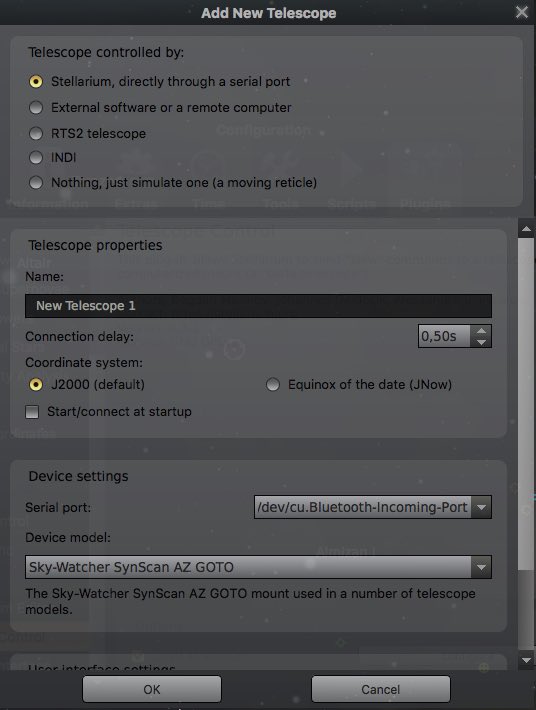
Click “OK,” and you will see your telescope in the list now.
Engage the connection
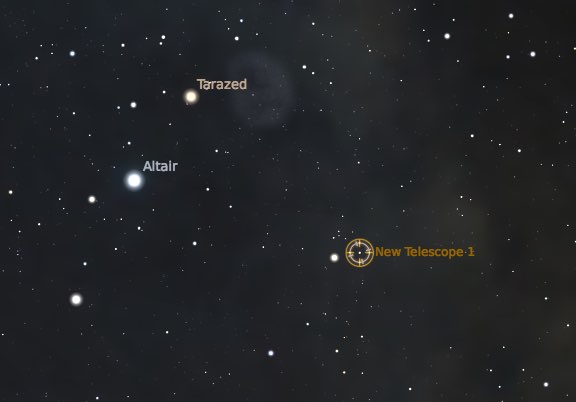
Hit the Start/Connect button to engage the connection. A small rectangle will appear on the sky map. This is the position where your telescope is pointing in the sky now.
To initiate the movement of the telescope, find an object you want to go to and click on it with the left mouse button.
After selecting it, hit Control+1 (Windows) or Command+1 (Mac OS X), and the telescope will automatically slew to the object’s position.
You will also see the rectangle moving across the map as the telescope is slewing to the position you picked in Stellarium.
You may like to read about
- 10 Advantages of Computer-Controlled Mounts for Telescopes
- 65 Best Online Astronomy Courses (From Beginner to Pro)
- Meade ETX 60 AT Review (Read This First!)
- Can I Use My Telescope Through a Window?